Once you install Configuration Manager, the initial configuration usually begins by configuring discovery methods. You want SCCM to discover the resources present in your network. SCCM comes built-in with several discovery methods. Most of them are not enabled by default. In this post we will see how to configure SCCM discovery methods. We will also see how to create boundary and boundary groups.
Discovery Methods in SCCM
As mentioned earlier, there are several discovery methods in SCCM. The discovery identifies computer and user resources that you can manage using Configuration Manager. It can also discovers the network infrastructure in your environment.
Discovery creates a discovery data record (DDR) for each discovered object and stores this information in the SCCM database. When a resource is discovered the information about the resource is put in a file that is referred to as a discovery data record (DDR).
DDRs are processed by site servers and entered into the SCCM database. From there they are replicated by database-replication with all sites.
Types of Discovery Methods
Let us a take a look at discovery methods and understand what each discovery method does.
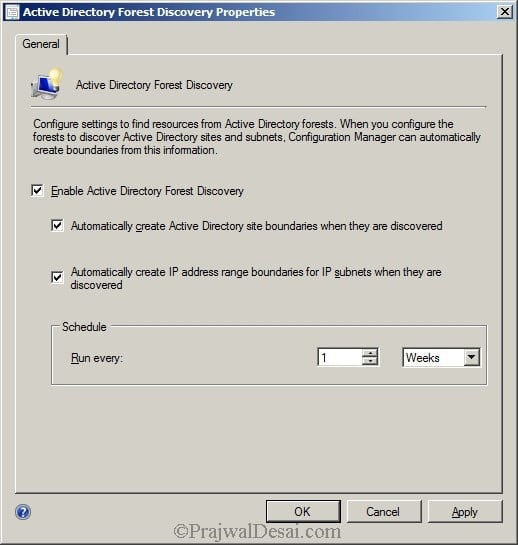
- Active Directory Forest Discovery – As the name suggests it discovers Active Directory sites and subnets. Once discovered it then creates boundaries for each site and subnet from the forests. Most of all you can automatically create the Active Directory or IP subnet boundaries that are within the discovered Active Directory Forests.
- SCCM Active Directory Group Discovery – This method discovers groups from the defined location in the Active Directory. The discovery process discovers local, global, and universal security groups. You can also discover the membership within these groups.
- Active Directory System Discovery – I think this is an important discovery method. This method discovers the computers in your organization from specified AD locations. In order to push SCCM clients on to the computers, the resources must be discovered first.
- Configuration Manager Active Directory User Discovery – This Discovery process discovers the user accounts from your Active Directory domain. You will have to specify the Active Directory container to search for the user accounts.
- HeartBeat Discovery – This is the only discovery method that is enabled by default. The HeartBeat Discovery runs on every SCCM client and is used by Active Configuration Manager clients to update their discovery records in the database. Furthermore the records are sent to the management point in specified duration of time. HeartBeat discovery is scheduled to run every 7 days.
- Network Discovery – The Network Discovery searches your network infrastructure for network devices that have an IP address. It can search the domains, SNMP devices and DHCP servers to find the resources. This includes printers, routers, and bridges.
Configure SCCM Discovery Methods
Now that we know what each SCCM discovery method does, we will configure each of them. Note that you can enable the discovery methods that you require.
Active Directory Forest Discovery
- Launch the System Center 2012 Configuration Manager Console.
- On the left pane select the Administration, expand Hierarchy Configuration.
- Select Discovery Methods. On the right pane double click “Active Directory Forest Discovery”.
- Check all the boxes to enable the AD Forest Discovery.
- Click Apply.
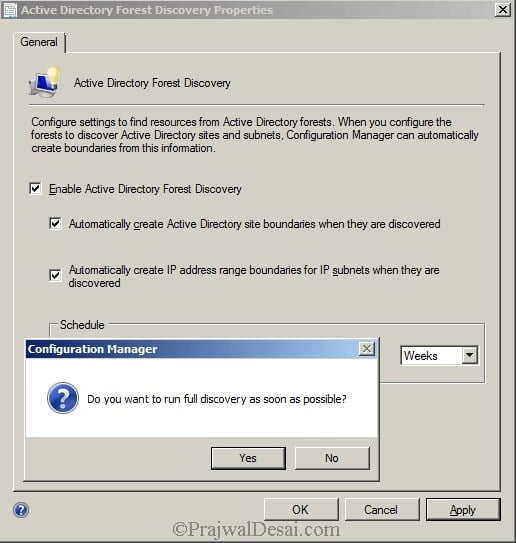
To run the full discovery as soon as possible, click Yes.
Active Directory Group Discovery
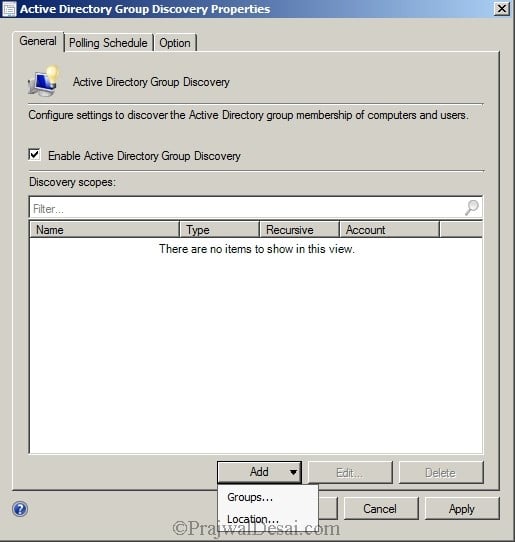
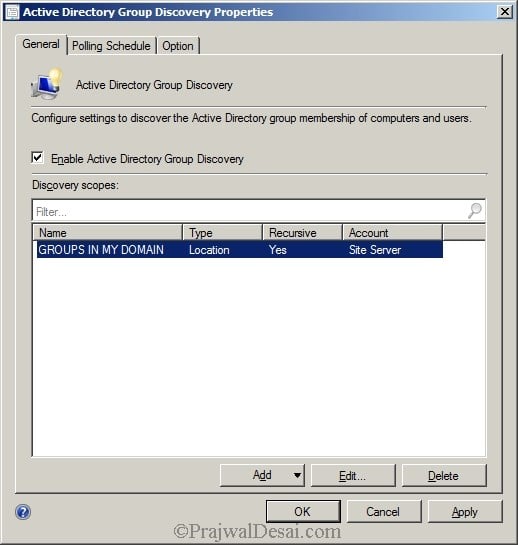
Double click the Active Directory Group Discovery. Check the box which says Enable Active Directory Group Discovery. Once you do that at the bottom you must specify either Groups or Location.
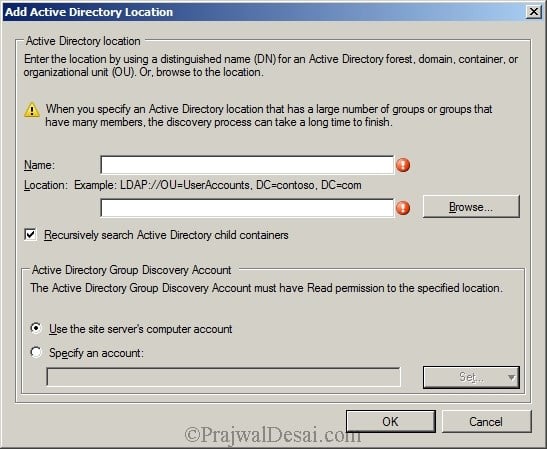
If you are choosing the first option i.e. groups, then you can add the multiple groups by specifying the distinguished name of the group. I prefer to choose the option Location.
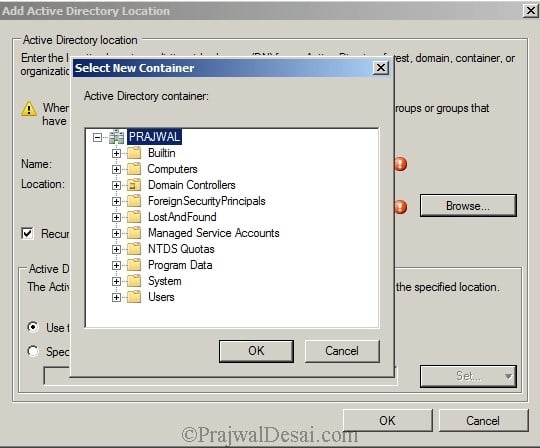
Click Browse and specify the location. Select the Active Directory Container. Click OK.
Specify Group Name and click OK.
You should find the group name that you entered in the above step. Lets take a look at Polling Schedule.
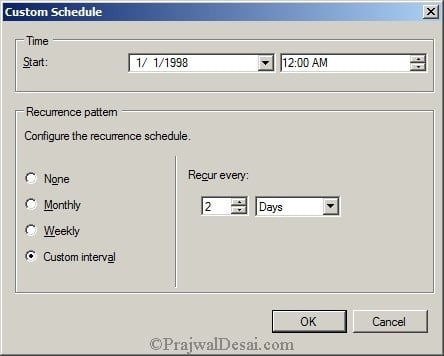
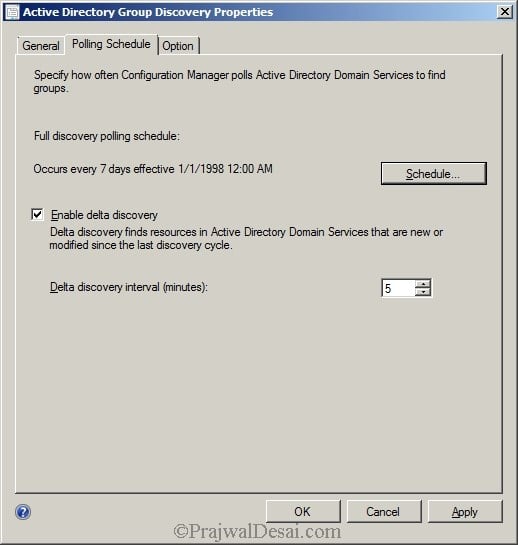
Polling schedule is how often the Configuration Manager polls the AD to find the groups. You can change the polling schedule by clicking on Schedule button.
We will change Recur Every from 7 days to 2 days. So that means the Active Directory Group Discovery will Poll the AD for groups, every 2 days. Click OK.
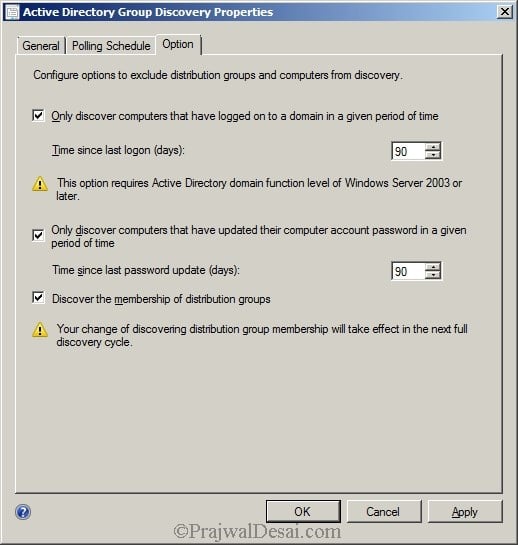
Click Option tab. Check all the check boxes. The first option will discover computers that are active since 90 days. The second option will discover computers that have changed/updated their computer account password in a period of 90 days. The third option discovers the membership of distribution groups. Click Apply and OK .
Active Directory System Discovery
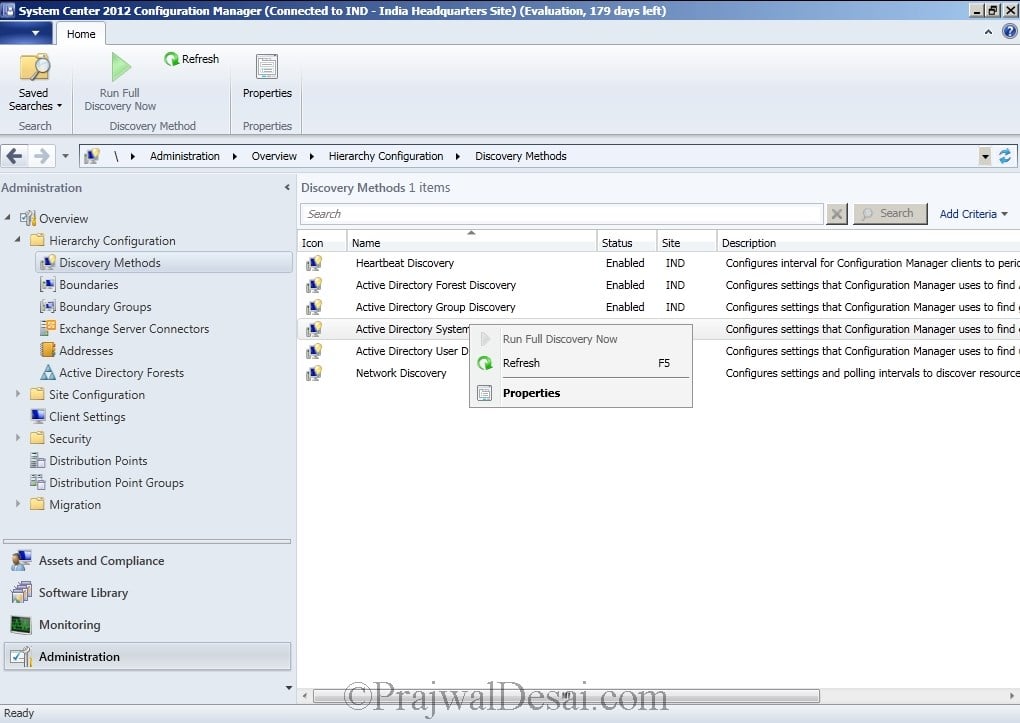
We will enable system discovery method. Right click Active Directory System Discovery and click properties.
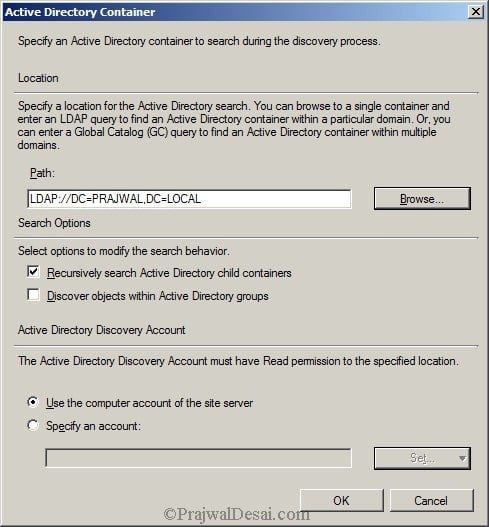
Click Enable Active Directory System Discovery. To add the Active Directory Containers click Orange color icon.
Next, click Browse and select the domain.
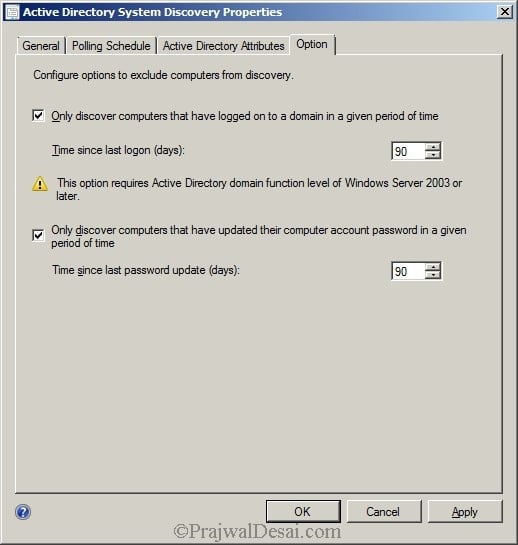
Click Option and make the changes shown in the below screenshot.
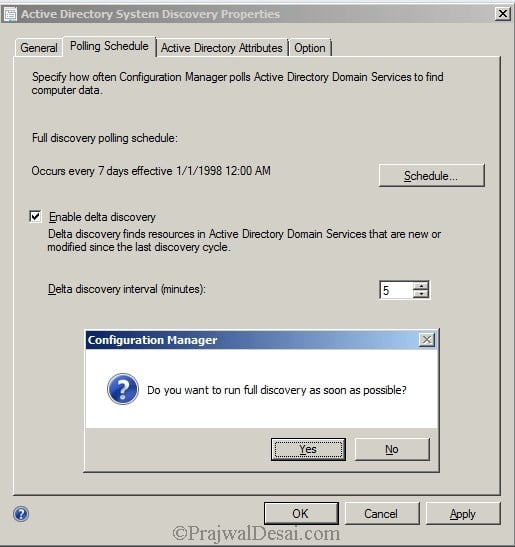
Click Apply. Run the full discovery by clicking Yes. Click OK and close the properties page.
Active Directory User Discovery
We will now enable user discovery method. Double click Active Directory User Discovery, enable the active directory User Discovery. Add the Active Directory Containers. Click OK.
 You can see the AD containers that you just added in the above step. Close the window now.

Boundaries and Boundary Groups in SCCM
As per Microsoft, a boundary is a network location on the intranet that can contain one or more devices that you want to manage. Boundaries can be either an IP subnet, Active Directory site name, IPv6 Prefix, or an IP address range.
To use a boundary, you must add the boundary to one or more boundary groups. Boundary groups are collections of boundaries. By using boundary groups, clients on the intranet can find an assigned site. In addition to that they can locate content such as applications, software updates, and operating system images. Active Directory Forest Discovery discovers boundaries automatically.
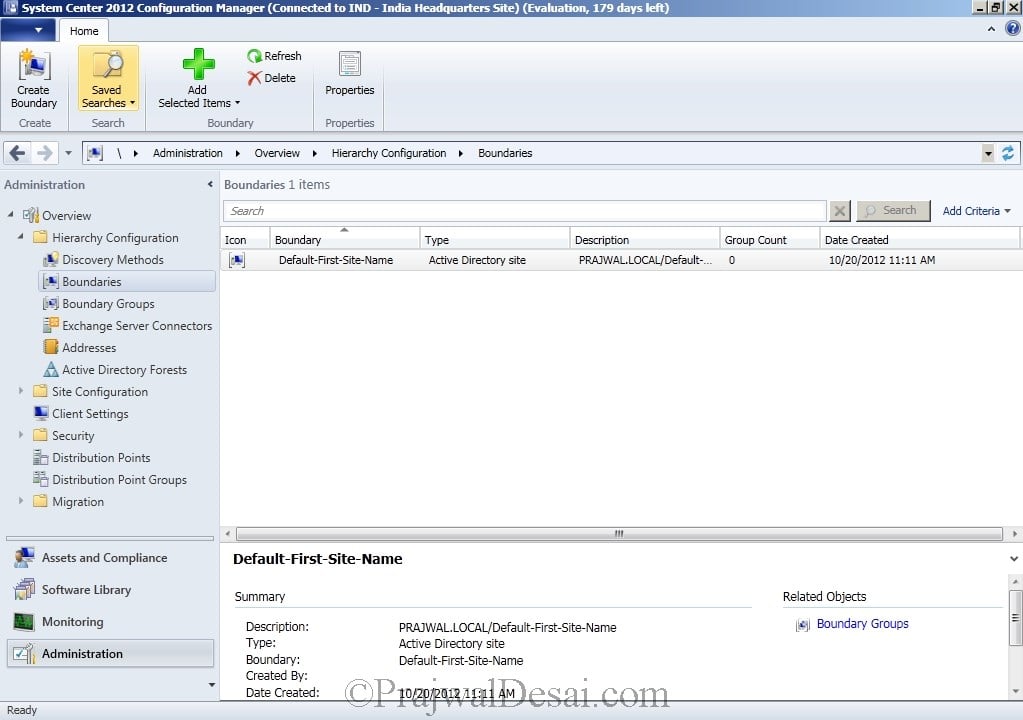
Lets take a look in the SCCM 2012 Console and find out whether a Boundary has been created or not. Bingo, the boundary has been discovered successfully.
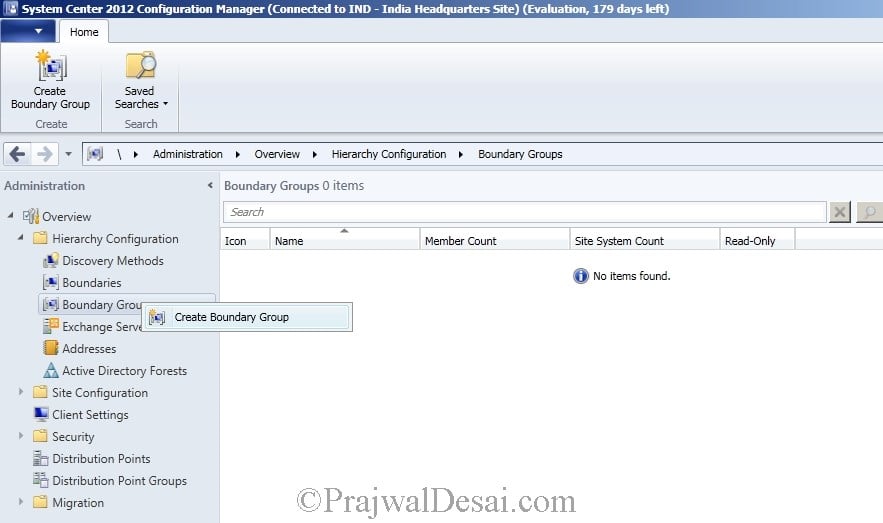
Now we need to add the Boundary to the Boundary groups. To do so Select Boundary Groups, right Click and create a boundary group.
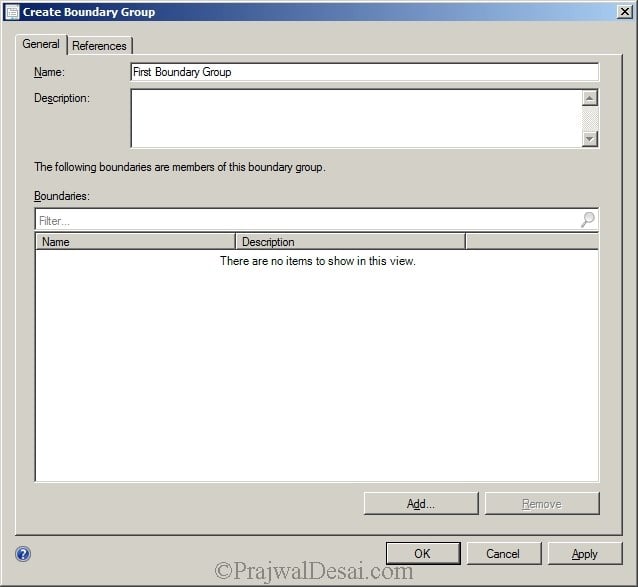
Provide a name as First Boundary Group. Click Add.
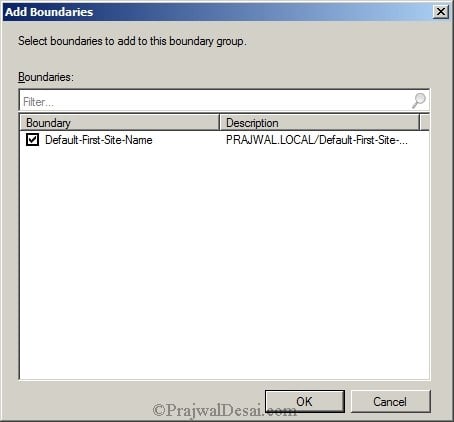
Select the boundary. In this case we only have a Default-First-Site-Name. Click OK.
Click on references tab, check Use this Boundary group for site assignment. To add the site system servers, click Add and select the Site System Server. Click OK.
Finally we see boundary group that we just created.
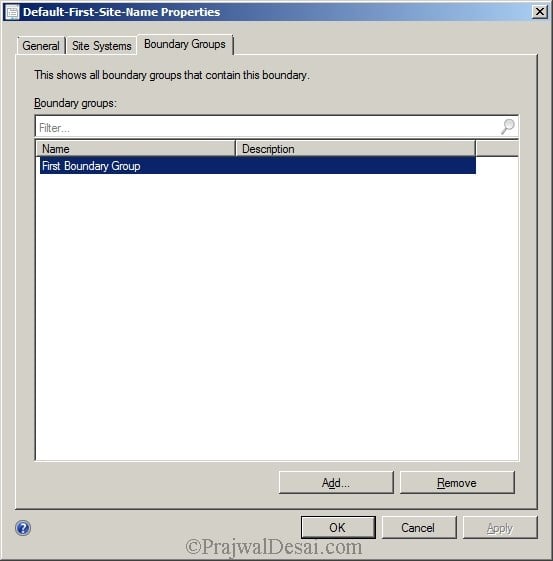
Select Boundaries from the left pane, right click the Default-First-Site-Name. Click Properties, under Boundary Groups you will find the First Boundary Group Added Automatically.








I have not unable to click in any option in MCM Window page
Check if the user account has permissions to perform those actions.
Hi there,
I am trying to create Boundaries However when I select (Active Direction Site) nothing is showing! what do you think?
Thank you in advance.
I’m implementing a new primary site to move from one server to another. Does heartbeat discovery discover devices across the network or ONLY within the boundaries that are set. I’m testing the new server and have added a boundary range of ONE ip address, my desktop. If I enable heartbeat discovery, will it only discover my desktop, or every desktop in our environment?
Hi Prajwal,
I have an issue with boundary group. I am not able to find boundary group in the boundaries that exist in SCCM. It was there until last month, but today we noticed boundary group is missing from quite a few boundary and no site roles were assigned to it
in My SCCM Console i only can see “network Discovery”
other discovery options are not showing.
Hi Prajwal,
I am facing issue in delay discovery of AD user group in SCCM, AD team created two new user groups 5 days ago in AD we have ran full discovery but it was not discovery after two days groups was discovered automatically. For test, AD team created one user group and many times we have ran full discovery but after 3 days the new group is not discovered.
why use of this of boundary and boundary groups and what happen
without asign this boundary groups to site systems.
please explain about this information sir,
thank you sir
I want to point my external clients to a MP we have in the DMZ. I went into the boundary group that those clients are in and pointed it to the MP in the DMZ but they are still pointing at the primary server. Is there another way to do this? I have come across another post that suggested uninstalling the client and reinstalling the client with the MP in the syntax.
Hello Prajwal,
Thank you again for the descriptive post.
I have a query regarding settting up boundaries and groups: If we have only one AD site, 50+ remote offices, 2000+ clients, how can i setup the boundary groups so that i can specify different distribution points to remote offices?
As reading your above post, i could see ip subnet may be the solution or should i configure forest discovery method initially ?
Please suggest ….
You can use the IP address range instead of IP subnet as it works fine.
Hello Prajwal,
PFA, May i know how i resolve this ?
Hi Shree,
Did you find a resolution for your issue? I inherited a failed implementation of SCCM and i am having a similar issue.
Hello, I need to push software package to child domain, they device collection i can see in boundary group. How can i deploy package on these devices? Thanks
SIr, What are the log files for SCCM?
Check this – https://www.prajwaldesai.com/sccm-log-files/
Is there a way to setup network discovery to only look in a set IP range aka 10.1.1.1 – 10.1.1.254 for simplicity in OSD?
Hello Prajwal,
first of all, great descriptive knowledge on SCCM versions.
I’m a beginner in using sccm 2012 and we are trying to do a POC and hence started with the Microsoft’s SCCM eval version(180 days) available in VHD format which can be imported to a VM and bypassing all the installation trouble.
I was wondering if you have any experience dealing with this VHD format, if so, the SCCM vhd is pre-configured with a domain ‘contoso’ and some dummy users/data. I wanted to know if there’s any way to manually add an IP range for a discovery. (note: the domain feature has been locked in the vhd format and hence unable to configure this as part of our domain system)
any help would be appreciated.
thanks again.
Hi,
I am facing issue with the boundary. actually my client is going to push out of boundary network. what can be the issue. pls suggest if you can. It would be a great help.
Thanks
AK
When you run the Active Directory Forest Discovery the boundary(s) would have been discovered automatically.. Did you create a boundary group and add proper boundary to that boundary group ? Please check once..